
Stamped Concrete Installation Guide for Patios: Step-by-Step
- tbsinfotech5
- Jan 23
- 9 min read
Crafting a beautiful outdoor retreat starts long before you see the elegant patterns and vibrant colors of stamped concrete come to life. For Northern Virginia homeowners, the real difference in a patio’s long-term strength and curb appeal begins with a carefully prepared foundation and attention to every detail of installation. When you follow a step-by-step process that addresses soil, drainage, form construction, and finishing techniques, you get results that last through hot summers and cold winters while enhancing your home’s value with a truly impressive patio. For those ready to invest in a durable transformation, understanding the critical importance of proper base preparation sets the stage for lasting success.
Table of Contents
Quick Summary
Key Point | Explanation |
1. Prepare Your Patio Base Thoroughly | Assess soil conditions, excavate 4-6 inches, and compact subgrade to ensure a stable foundation for your concrete patio. |
2. Use Quality Concrete and Mix Correctly | Choose a 4000 psi mix with the right water-to-cement ratio for optimal strength, and mix in small batches for consistent quality. |
3. Ensure Proper Pouring and Leveling Techniques | Pour concrete methodically, use a screed to level, and finish with a bull float to maintain a smooth surface for stamping. |
4. Apply Color and Stamping with Care | Use either integral color or dry-shake hardeners for coloring, and ensure even distribution while stamping to create defined textures. |
5. Complete Curing and Sealing for Durability | Maintain moisture during curing and apply a high-quality sealer afterwards to protect and enhance the longevity of your patio. |
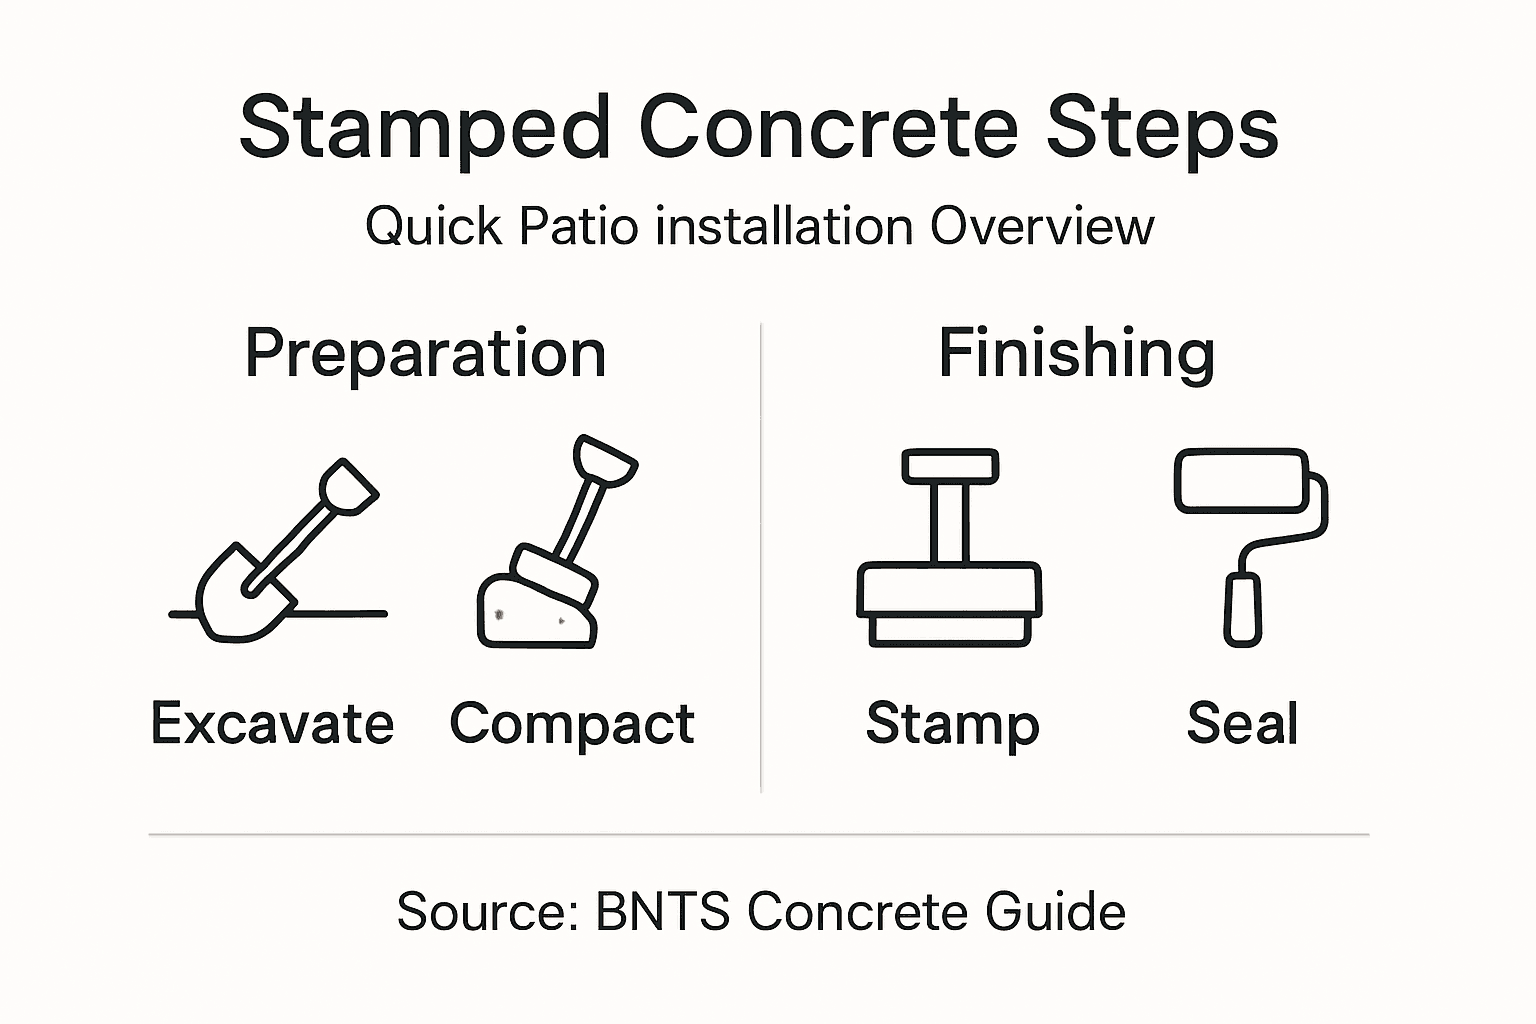
Step 1: Assess and Prepare the Patio Base
Before pouring any concrete, you’ll need to carefully assess and prepare your patio’s base area for optimal stamped concrete installation. This crucial first step determines the long-term stability and performance of your outdoor space.
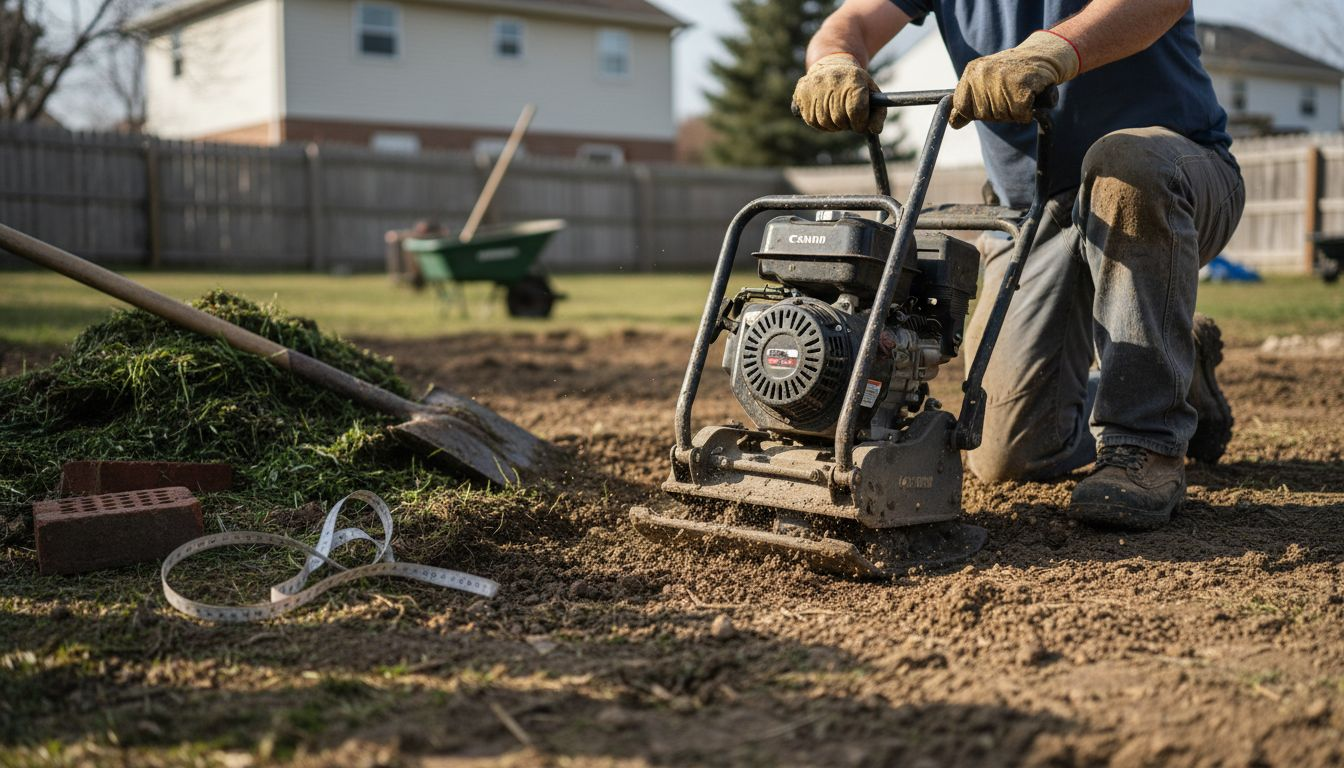
Successful base preparation starts with thorough ground evaluation. You’ll want to excavate the designated area to a depth of approximately 4-6 inches, removing grass, roots, and any existing debris. Soil conditions play a critical role in determining the subgrade treatment for concrete slabs. Clay soils, for example, require more extensive preparation compared to sandy or loamy ground. Check for proper drainage slope away from your home’s foundation - ideally, you want a minimum 2% grade to prevent water accumulation.
After excavation, compact the subgrade using a plate compactor to create a stable, uniform surface. This step eliminates potential settling issues that could compromise your concrete’s integrity. Add a layer of gravel or crushed stone as a base material, spreading it evenly and compacting in 2-inch increments to ensure maximum density. The base material will improve drainage and provide additional structural support for your stamped concrete patio.
Here’s a summary of subgrade treatments for different soil types:
Soil Type | Preparation Method | Drainage Reliability | Compaction Difficulty |
Clay | Deep excavation, add gravel | Low | High |
Sandy | Shallow excavation, slight compaction | High | Low |
Loamy | Moderate excavation, balanced approach | Medium | Medium |
Pro Tip: Rent a professional-grade plate compactor instead of using a hand tamper to achieve more consistent and thorough ground compaction for your patio base.
Step 2: Set Forms and Mix Concrete Properly
Now that your patio base is prepared, you’ll move into the critical phase of setting concrete forms and preparing the right concrete mixture for your stamped patio project. This step requires precision and careful planning to ensure a professional finished result.
Begin by creating your concrete forms using sturdy wooden boards or specialized form materials. When constructing concrete forms, focus on creating straight, level edges that will define your patio’s shape. Secure wooden forms with stakes placed every 2-3 feet, ensuring they are level and braced firmly to withstand the pressure of wet concrete. Remember to apply a light coating of form release oil to prevent the concrete from sticking and make removal easier after curing.
For the concrete mixture, choose a high-quality mix appropriate for stamped concrete typically with a compressive strength of 4000 psi. The water-to-cement ratio is critical measure your ingredients precisely and aim for a consistency similar to thick pancake batter not too wet or dry. Use a mechanical mixer to ensure uniform blending and eliminate potential weak spots in your final surface. Consider adding color hardener or integral color during mixing to achieve your desired aesthetic effect.
Pro Tip: Mix your concrete in smaller batches to maintain consistent quality and prevent partial setting before you can complete the pouring process.
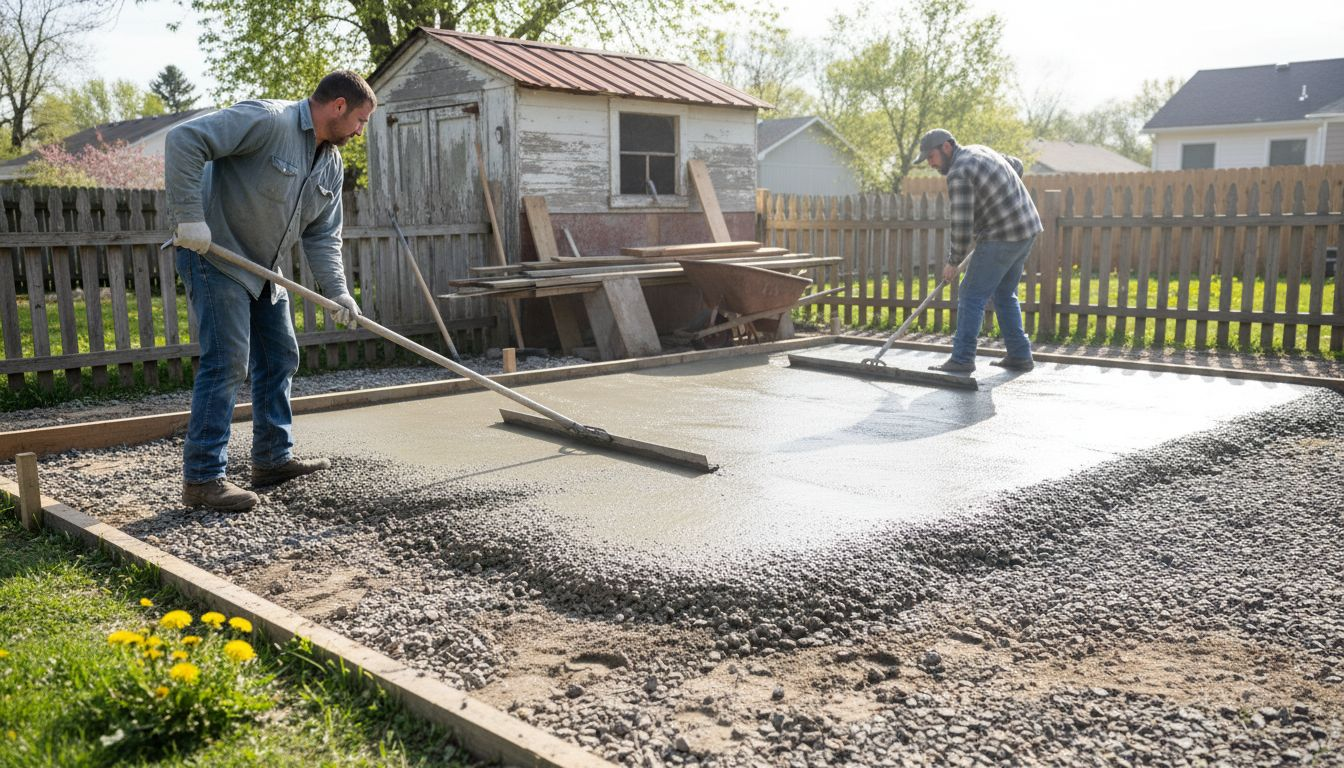
Step 3: Pour and Level the Concrete Surface
With your forms set and concrete mixed, you are now ready to transform your prepared patio area into a smooth, professional surface. This critical stage requires precision, patience, and the right technique to achieve a flawless foundation for your stamped concrete design.
Begin pouring the concrete mixture carefully and systematically across your prepared forms. Use a concrete placement technique that ensures even distribution, starting from one corner and working your way across the entire surface. As you pour, use a long straight board called a screed to level the concrete by moving it in a sawing motion across the top of the forms. This process helps eliminate high and low spots, creating a uniform surface depth. Work quickly but methodically, as concrete begins to set relatively fast.
After screeding, use a bull float to smooth the surface and push down larger aggregate particles. Move the float in overlapping passes, keeping the tool slightly tilted to prevent digging into the concrete. Pay special attention to maintaining a slight slope away from any structures to ensure proper water drainage. Remove any excess water from the surface by gently floating, which will help prevent surface weakening and improve the concrete’s overall durability.
Pro Tip: Work with a partner during concrete pouring to ensure faster, more consistent placement and help manage the time sensitive nature of concrete setting.
Step 4: Apply Color and Stamping Techniques
With the concrete surface leveled and setting, you are ready to transform your plain concrete into a stunning decorative masterpiece. This stage requires precision and creativity to achieve the realistic textures and rich colors that make stamped concrete so appealing.
Start by applying color using stamped concrete coloring methods that add depth and visual interest. You can choose between integral color mixed directly into the concrete or dry-shake color hardeners applied to the surface. Broadcast the color evenly, ensuring consistent coverage across the entire patio area. Immediately after coloring, sprinkle a release agent over the surface this will prevent your stamping tools from sticking and create subtle color variations that enhance the final look.
Below is a comparison of stamped concrete coloring methods:
Method | Application Process | Color Consistency | Visual Effect |
Integral Color | Mixed into wet concrete | Very uniform | Subtle, all-over |
Dry-Shake Hardener | Broadcast on surface | Moderate uniformity | Rich, varied tones |
Next, carefully position your stamping mats or skins onto the concrete surface. Work systematically from one corner of the patio, pressing the tools firmly and evenly to create crisp, defined patterns. Choose from textures like natural stone, brick, wood plank, or custom designs that complement your outdoor space. Move quickly and confidently to ensure each stamp connects seamlessly with the previous one. Pay close attention to maintaining consistent pressure and alignment to avoid awkward pattern breaks or uneven textures.
Pro Tip: Practice your stamping technique on a small concrete sample board before working on your actual patio to build confidence and perfect your approach.
Step 5: Cure and Seal for Lasting Durability
With your stamped concrete patio taking shape, the final critical steps involve proper curing and sealing to protect your investment and ensure a beautiful, long lasting surface. These processes are essential for maintaining the aesthetic appeal and structural integrity of your new outdoor space.
Begin the curing process by maintaining concrete moisture and temperature through carefully controlled methods. Cover the surface with plastic sheeting or damp burlap to prevent rapid moisture loss, which can cause cracking and weaken the concrete. Maintain consistent moisture for at least 7 days, keeping the surface slightly damp but not saturated. The goal is to allow the concrete to reach its maximum potential strength and durability by supporting the critical chemical hydration process.
After the concrete has fully cured typically around 28 days apply a high-quality concrete sealer to protect your stamped surface. Clean the area thoroughly, removing any dust or debris, and choose a sealer specifically designed for stamped concrete. Apply the sealer evenly using a roller or sprayer, working in thin, consistent layers. This protective coating will guard against water penetration, staining, and wear while enhancing the color and texture of your decorative concrete patio. Reapply the sealer every 2-3 years to maintain optimal protection and appearance.
Pro Tip: Wait for a dry day with temperatures between 50 and 80 degrees Fahrenheit to apply your concrete sealer for the most effective and long lasting results.
Step 6: Inspect Finished Patio for Quality
Congratulations on completing your stamped concrete patio installation. The final step involves a thorough visual and tactile inspection to ensure your hard work meets professional standards and your expectations for durability and aesthetic appeal.
Begin your concrete surface inspection by carefully examining the entire patio surface for uniformity, consistency, and potential defects. Look closely at the stamped pattern to verify that each impression is crisp and well-defined, with no areas of incomplete or irregular texture. Check for any signs of surface imperfections such as small cracks, uneven coloration, or areas where the stamping might have skipped or overlapped incorrectly. Pay special attention to the edges and corners, where installation errors are most likely to occur.
Evaluate the overall surface for structural integrity and finish quality. Walk the entire surface, feeling for any significant level changes or areas that might feel unstable. Test the sealer by dropping small amounts of water in different areas to confirm proper water beading and surface protection. Measure the surface slope to ensure proper water drainage away from your home or other structures. Take photographs of the completed project from multiple angles to document the work and help identify any areas that might need touch up or adjustment.
Pro Tip: Perform your final inspection under different lighting conditions natural daylight and artificial light to catch subtle imperfections that might be missed during a single viewing.
Enhance Your Outdoor Living with Expert Stamped Concrete Services
Preparing the perfect patio requires careful attention to base assessment, concrete mixing, stamping, and sealing. If you are feeling overwhelmed by steps like subgrade preparation, ensuring proper drainage, or achieving that flawless stamped pattern, you are not alone. Many homeowners share the goal to create a durable, beautiful stamped concrete patio that stands the test of time without cracking or fading. Our team specializes in tackling these challenges through expert craftsmanship in Stamped Concrete and regular concrete solutions tailored to your unique outdoor space.

Don’t leave your patio’s success to chance. Trust the experts who understand every detail from compaction to sealer application. Visit BNTS Construction today and discover how we bring your stamped concrete vision to life. Whether you want a custom patio, foundation, or masonry work, take the first step toward a stunning, lasting surface that enhances your home’s value and enjoyment.
Start your project now to avoid costly mistakes later by contacting us for professional support and consultation at BNTS Construction. Explore our range of concrete services and let us help you create the patio you deserve.
Frequently Asked Questions
How do I prepare the base for stamped concrete installation?
To prepare the base for stamped concrete installation, excavate the area to a depth of 4-6 inches, removing all grass, roots, and debris. Use a plate compactor to compact the subgrade, followed by adding a layer of gravel or crushed stone for drainage and support.
What is the ideal water-to-cement ratio for mixing concrete?
The ideal water-to-cement ratio for mixing concrete is crucial for achieving the right consistency, typically resembling thick pancake batter. Measure your ingredients precisely to maintain this ratio, which helps ensure the finished concrete is strong and durable.
How can I apply color to my stamped concrete patio?
You can apply color to your stamped concrete patio using integral color mixed into the concrete or dry-shake color hardeners broadcasted on the surface. Choose a method that suits your design preferences and ensure that the color is applied evenly for a consistent finish.
What should I do to cure and seal my stamped concrete patio?
To cure and seal your stamped concrete patio, cover the surface with plastic sheeting or damp burlap for at least 7 days to maintain moisture. After the concrete has cured, apply a high-quality concrete sealer evenly to protect the surface and enhance its appearance.
How do I inspect my finished stamped concrete patio for quality?
Inspect your finished stamped concrete patio by examining the surface for any imperfections, checking the clarity of stamped patterns, and ensuring there are no uneven textures. Walk the space to feel for stability and observe for water drainage to confirm structural integrity.
What tools do I need for stamping concrete?
You will need several tools for stamping concrete, including concrete forms, a screed board, a bull float, stamping mats or skins, and a plate compactor. Ensure you have all the necessary tools on hand before beginning your project to streamline the installation process.
Recommended
Comments